Wii U tablets, also known as GamePads, are essential components of the Wii U gaming system. The tablet’s touchscreen serves as an interactive interface, adding an extra dimension to the gaming experience. But what happens when this screen gets damaged? A cracked or malfunctioning screen can make gaming challenging and unenjoyable.
Fortunately, you don't need to buy a new device if your Wii U tablet screen is damaged. Screen replacement is a practical solution that can save you money and extend the life of your device. In this guide, we will walk you through the process of replacing the Wii U tablet screen, detailing the necessary tools, preparations, and steps.
To effectively replace the Wii U tablet screen, it's essential to understand its components. The Wii U GamePad features a touchscreen display that performs various functions, such as menu navigation, drawing, and offering additional information during gaming. The screen's responsiveness and clarity are paramount to an optimal gaming experience.
The tablet screen consists of an LCD (Liquid Crystal Display) and a digitizer. The LCD is responsible for displaying the visual content, while the digitizer senses touch input. Both components work seamlessly, and damage to either could necessitate a replacement.
Over time, regular use, accidental drops, or excessive pressure can lead to screen damage. Symptoms of a damaged screen include unresponsive touch, dead pixels, cracks, or discoloration. Replacing a faulty screen can restore your GamePad to its original functionality, ensuring you continue to enjoy your gaming sessions.
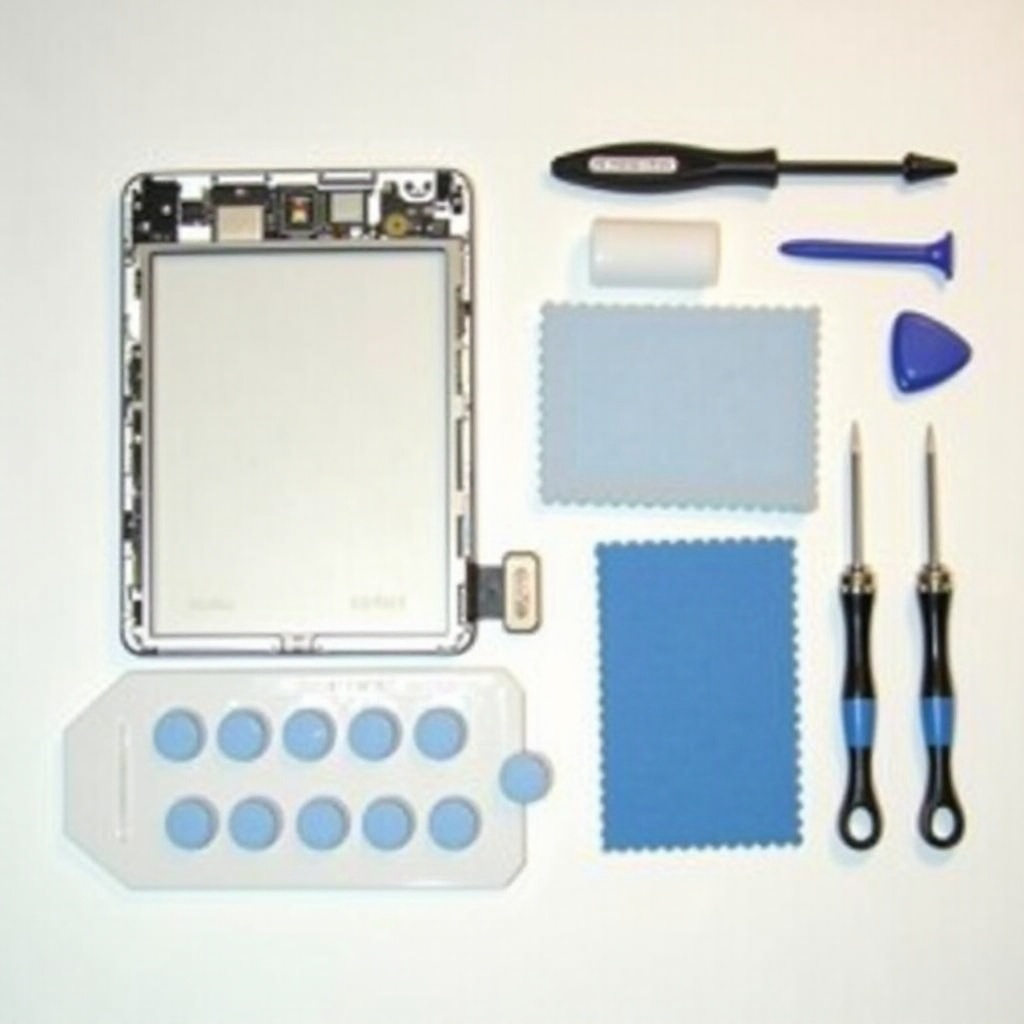
Before starting the replacement process, gather all the necessary tools and materials to ensure a smooth operation. Here’s a list of what you will need:
Having the right tools and materials at hand will make the process more straightforward and minimize the risk of further damage to the device.
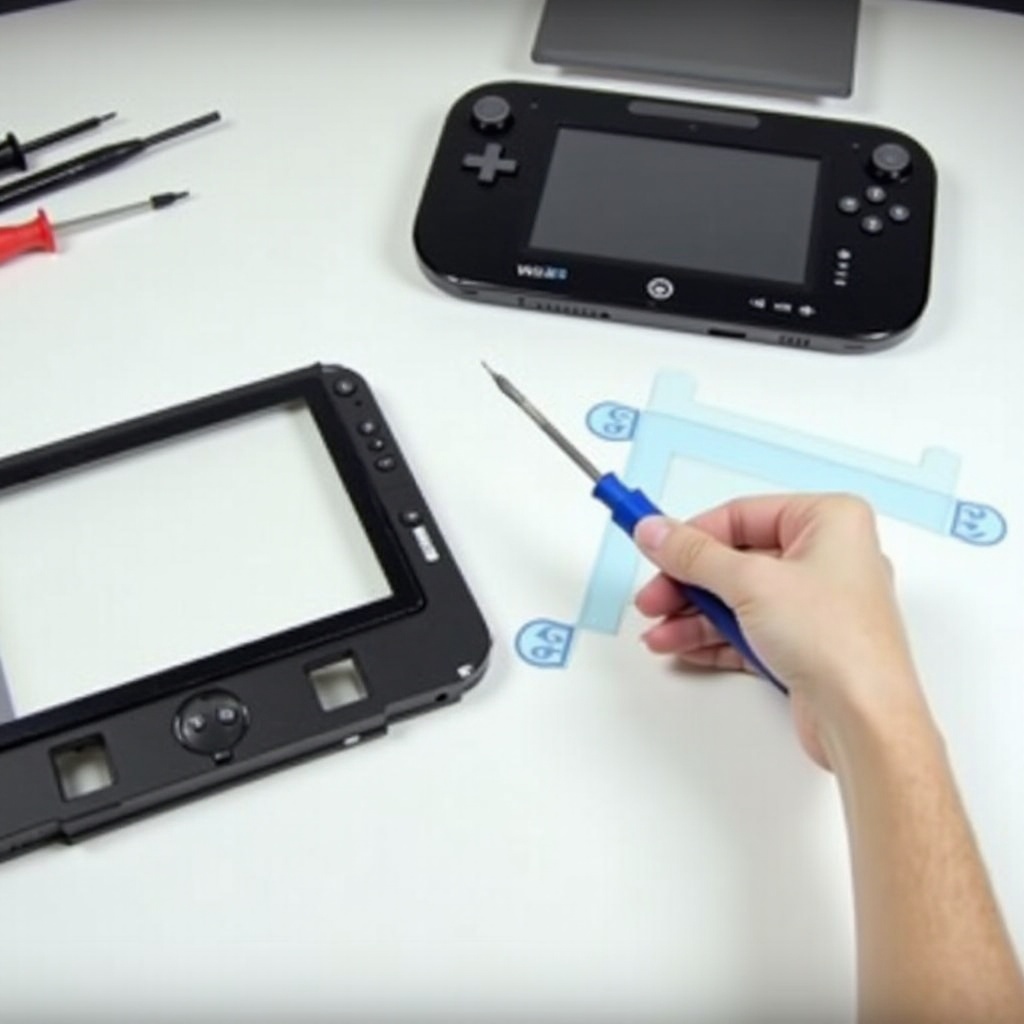
Replacing the Wii U tablet screen requires careful preparation and attention to detail. Follow these steps for a successful replacement:
Ensure the Wii U GamePad is completely powered off and disconnected from any chargers or cables.
Workspace Setup:
Select a clean, flat, and well-lit workspace. Lay down an anti-static mat if available, to avoid static damage.
Organize Screws:
Using a Phillips screwdriver, remove the screws securing the back cover. Carefully lift the cover to avoid damaging any cables.
Disconnect Battery:
Gently detach the battery to prevent any electrical damage while working on the components.
Detach Ribbon Cables:
Locate and carefully detach the ribbon cables connecting the screen to the motherboard using tweezers.
Separate Screen from Housing:
Use plastic opening tools to carefully separate the screen from the plastic housing. Take your time to avoid damaging the frame.
Remove Adhesive:
Use a microfiber cloth and compressed air to clean any dust or residue from the housing and internal components.
Attach New Screen:
Carefully place the new screen into the housing. Ensure it aligns correctly with the screw holes and connectors.
Reconnect Ribbon Cables:
Reconnect the ribbon cables securely to the motherboard. Ensure they are attached firmly to avoid future connectivity issues.
Reassemble GamePad:
Once you have reassembled your Wii U GamePad, it’s crucial to test the new screen thoroughly. Power on the device and observe the screen for any issues such as unresponsive touch, dead pixels, or display problems.
Use the Wii U’s settings menu to calibrate the touchscreen. This ensures it registers touch input accurately.
Game Testing:
If any problems arise, double-check the connections and ensure the screen is installed correctly. Proper calibration and thorough testing will ensure your new screen provides the best gaming experience.

Proper care and maintenance can extend the life of your new Wii U screen. Here are some tips to keep it in top condition:
Apply a screen protector to guard against scratches and minor damage.
Clean Regularly:
Clean the screen with a microfiber cloth to remove smudges and fingerprints.
Avoid Excess Pressure:
Handle the GamePad gently and avoid applying excessive pressure to the screen.
Protect from Falls:
Adhering to these practices will help maintain the integrity and functionality of your Wii U tablet screen.
Replacing the Wii U tablet screen might seem daunting, but with the right tools and instructions, it’s a manageable task for any DIY enthusiast. Follow this guide to restore your GamePad and enjoy uninterrupted gaming.
Signs include unresponsive touch, visible cracks, dead pixels, and inconsistent display colors.
You can find replacement screens from reputable online retailers, electronic spare parts suppliers, and specialty gaming stores.
While replacing the screen requires technical skills, following a detailed guide and using the right tools can make the process manageable for most DIY enthusiasts.